Monday 22 February 2016

ServiceNow Import Sets and Tables - Fetching data from Outside Sources

You were using age old CSVs or Excels to save your data. Now you come to know about ServiceNow and started using that for your service management needs. What about the huge data I already have??

One way is to manually enter the data into a SNOW table. But that is not feasible if the data is very large.

Second option can be to create a record in the new SNOW table and attach the file there.

If either of these option doesn't suit you what you need is an Import Set table.

An Import Set gets the data from the specified file and inserts it into the target table as manually entered records.

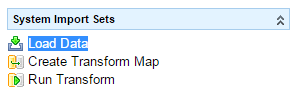
To create an import set, first go to System Import Sets > Load Data.


Supply the name of new table as desired and upload the .xls or .csv file you have. Generally the header field is Row 1, but change it if this is not the case for you. In case of multi-sheet excel, please supply the sheet number to be imported as well.


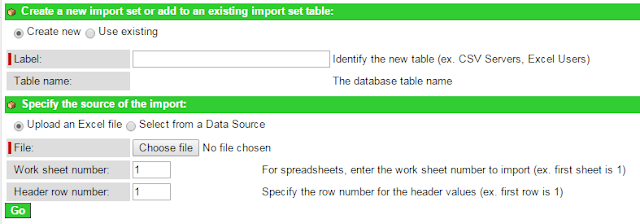
Click on Go and wait for it to upload successfully.


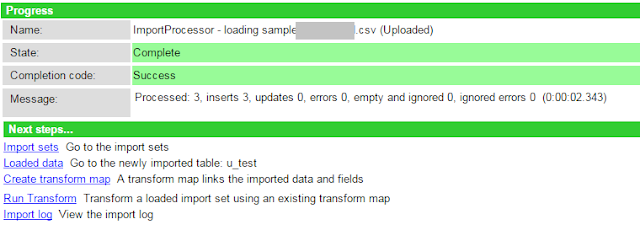
Now you have the data in the table name you provided in the earlier step. If you want you can go and do a sanity check.

Next, we need to move the data to our desired table. For that, we will create a transform map to specify the field mapping and to apply the transformations, if any.

Click on Create transform map from Next steps....


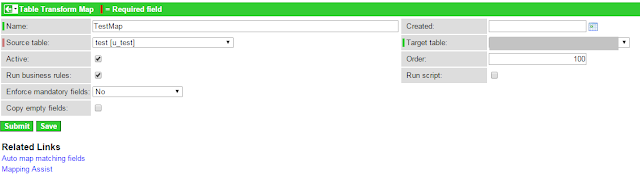
Name your transform map and specify the target table. Click Save.

You will see the Field Map related list at the bottom of the page. Field Maps specify the mappings between individual fields. If your source data and target table have the same header, you may try using Auto map matching fields link from the Related Links. Otherwise, click on New.


Specify the Source and Target Fields here and create one per field you want to map.

And...you are done!

Please comment for any issues/suggestions. Tada!! :)

Friday 19 February 2016

Script Include - Get Current Logged In User

We need the details of the current user at many times. This is a very short code that helps you get the glideRecord of the row in sys_user table pertaining to the current user.

Coming straight to the code -

getCurrentUser: function()
{
var gr = new GlideRecord('sys_user');
gr.addQuery('sys_id', gs.getUserID());
gr.query();
gr.next();
return gr.user_name;
}

gs.getUserID() returns the sys_id of the record. We are using gliderecord to filter sys_user table.

That's It!! :)

Go ahead and use the code to fetch the data. Thanks :)

Thursday 18 February 2016

Moving Homepages, Data or Scheduled Jobs between Instances

With ServiceNow, we follow the practice of having multiple instances - for Development, Unit Testing, UAT and of course a live or production environment. Some organizations also have sand environments for mock deployment. Here, what saves us from having to do the same work over and over again in different instances is Update Set. Update sets help us to move all our customizations from one instance to another in a matter of seconds and also informs us of any conflicts that might exist.

But there are three things an update set doesn't capture -

  1. Data in the tables
  2. Scheduled Jobs
  3. Home Pages
But we do need to move these as well at some point in time. Today, I am posting how can we achieve there movement as well. And this is so easy!! :)

  1. First, go to the record you want to move and right-click the record header.
  2. Select Export > XML(This Record)
         

      3. The record will be downloaded in your system.
      4. Go to second instance - the one where you want to import the data.
      5. Activate security_admin role.
      6. Go to any table listing. Right-click the header.
      7. Select Import XML.


      8. Go to the file you downloaded earlier and click Upload.


And....you are done!!

Go to the table or scheduled jobs to check. :)

Please drop your doubts/suggestion/issues in comments. Cya!!

Monday 15 February 2016

ServiceNow Table Attachments - Reading Data from attachments

ServiceNow provides us with a great feature of adding attachments to table records. And everything here is practically a table. So everything can have attachments. We need to read the data in the files that are attached at many times. Here I am sharing a code snippet that can help you achieve the same.

                recordId = 'myRecordSysId'; //sys_id of the record that contains attachment
                var attGr = new GlideRecord('sys_attachment');  //go to sys_attachment table
    attGr.addQuery('table_name', 'myTableBName'); //specify your table name as second parameter
attGr.addQuery('table_sys_id', recordId);
attGr.orderByDesc('sys_updated_on'); //helps to retrieve the latest attachment to record
attGr.query();
if(attGr.next())
       {
var gsu = (typeof GlideStringUtil != 'undefined') ? (GlideStringUtil) : (Packages.com.glide.util.StringUtil); //few versions support the first one, other supports second
var gsa = (typeof GlideSysAttachment != 'undefined') ? (new GlideSysAttachment()) : (new Packages.com.glide.ui.SysAttachment());
var attachmentData = gsa.getBytes(attGr);
var attachment = String(Packages.java.lang.String(attachmentData));
gs.print(attachment); //the data in the file will be printed as String

This code works practically with all the versions of ServiceNow be it Eureka or Geneva, still if it doesn't work somehow for you please drop a comment below. :)

Queries are most welcome... :)

Sunday 14 February 2016

ServiceNow Tables: Using CSS in columns - Use image in columns based on field values

Well, there was a requirement from my client that they want to see a green smiley if the field value coming from a mid-server is 1 and a red smiley if the field value is 0. How to do that now? :O :O

I searched for a similar table they sent me as a reference and found the way out!! :D

So, here are the steps to show your custom images in the columns instead of field values. Something like this -


The twist here is that you need two different columns - one having the value to determine the image and another one to show the desired image. 

Because what we have is the feature to add a background image. If you will use the same column you will see the value which is specifying the image to be used, 0 and 1 in my case, over your image - not a good view for my eyes. You can use the same column if you don't mind this view. Here's the dictionary entry for the columns I created -


Another twist - for the second column you will be creating, the one which will house the images, you must put a default value of a white space.

This is because the background image will only come up if there's a foreground text. We don't want anything visible there so we'll use a blank space.

After creating the columns, go to the table list view - the view which shows the table content in a list view. /table_name_list.do.

Open one of the records present in the table. Right click the record header and select Personalize > All.


Go to Styles tab.


Click New.

In Field name, specify the field where you want the image to be shown.

Specify condition in Value field. Use current to access the variables from the same record. For ex- to use red-smileys when heartbeat_alarm field is 0, I have this in the value field -

javascript: current.u_heartbeat_alarm == "0"

Now, in style block, we have to specify the image and the relative CSS. In my case the style field holds this value -

background-image: url('Lanes-RedSmiley.png');
background-repeat: no-repeat;  
background-position: 50% 5px;  
padding-right: 30px;

The final thing looks like this -


Save it and you are done!! :)
You can use whatever image you want and can modify it in many ways using the css.

The same technique can be used if you want to bold or italicise a field based on what value it holds. Or if you want the color of the field to be changed according to values.

Feel free to add anything by commenting. :)